

I don’t know about you guys, but $300.00 as the average price for a light table seems a bit insane to me! You may have seen these guys at children’s museums or kindergarten classrooms, but they’re starting to pop up in subdivisions as well!

For my son’s 3rd birthday, I knew I wanted to invest in Magnatiles. YAY for Target carrying the line!
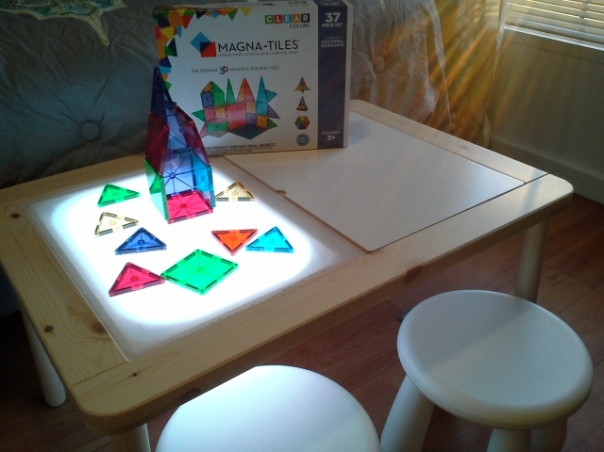
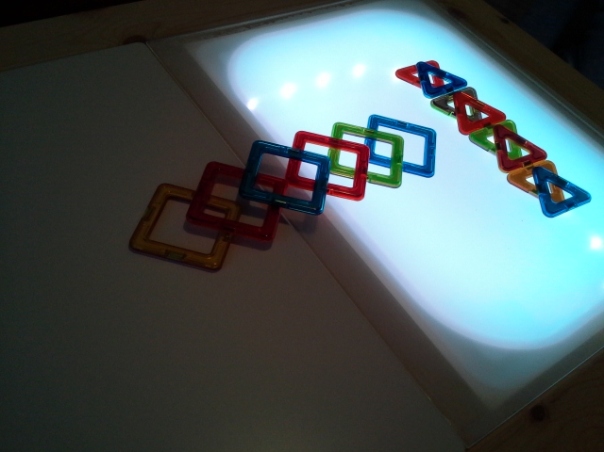
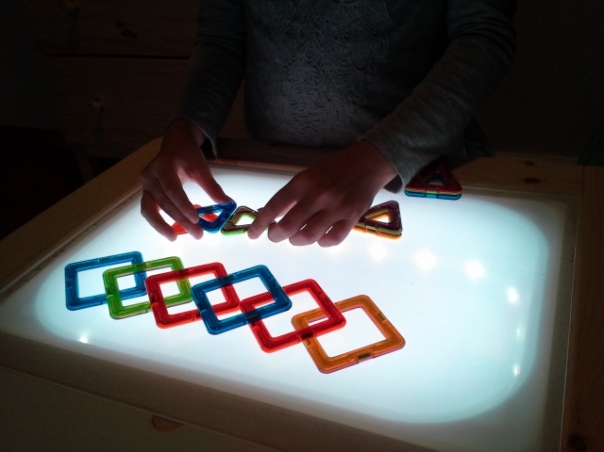
While basic play would surely be enough to entertain him, I wanted to add the light factor to enhance play time (and the educational bonus as there are SO many things you can do with a light table!). You can clearly see the difference in playing with these type of tiles on a regular table verses a light table:
I seriously could not believe the price tag for these tables when I started researching! While several pinterest people made DIY light tables, they weren’t exactly what I was looking for. Thankfully, Ikea and my husband’s handyman-ness saved the day!
We purchased the Ikea Flisat Children’s table for $49.99, and added two coordinating storage bins for $3.00 each. Built as intended, the table has room for two children to sit and play together at the same time, with ample toy / craft storage under the removable table top.


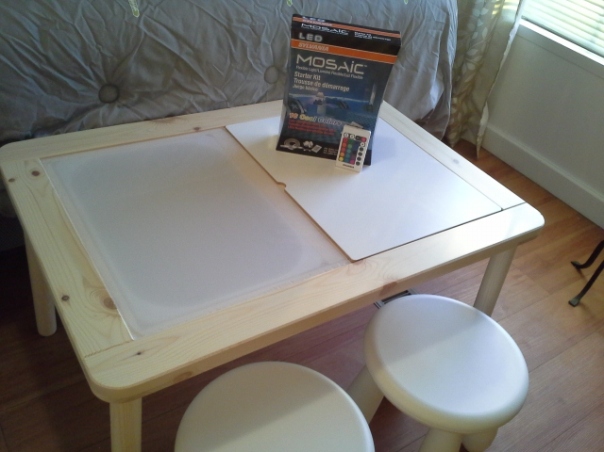
We decided to keep one half of the table in its original condition for my soon-to-be first grader to use as a desk / drawing area / lego building station. We used an acrylic sheet cut to size (Lowe’s will cut it for you for FREE!) to replace the second half of the table top. TIP: Keep the protective film ON the plexi glass or else you’ll have to use frost spray to duplicate the look.


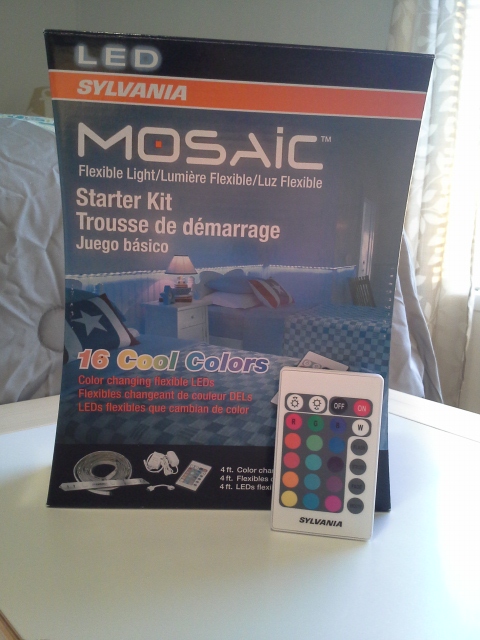
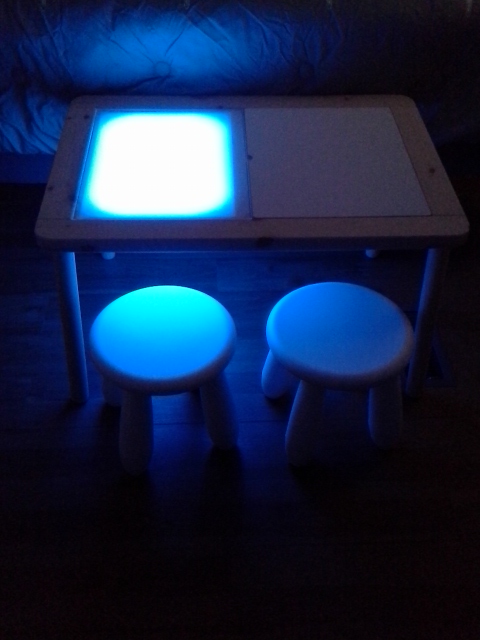
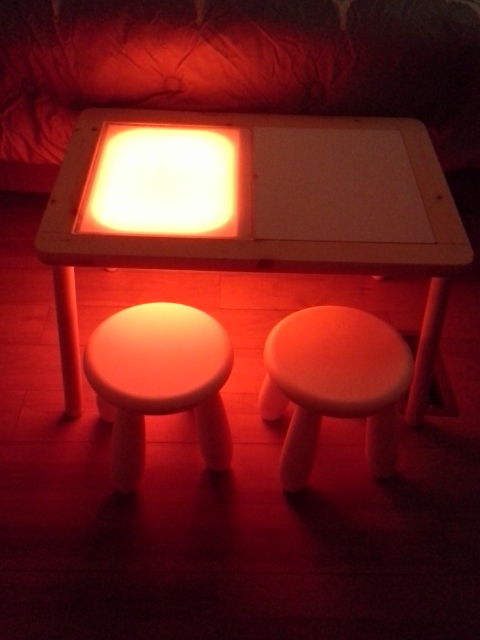
Deciding on the lighting was honestly the hardest / longest part of this project. My first thought was to use the LED puck lights you would normally place under a cabinet. However, my husband really wanted to go with the LED strip lights, and once I saw them at the store, it was an obvious answer as to what we should go with! This particular kind has a wireless remote control that can cycle through 16 colors in a strobe feature, or fade (my favorite), or just stay on one single color.
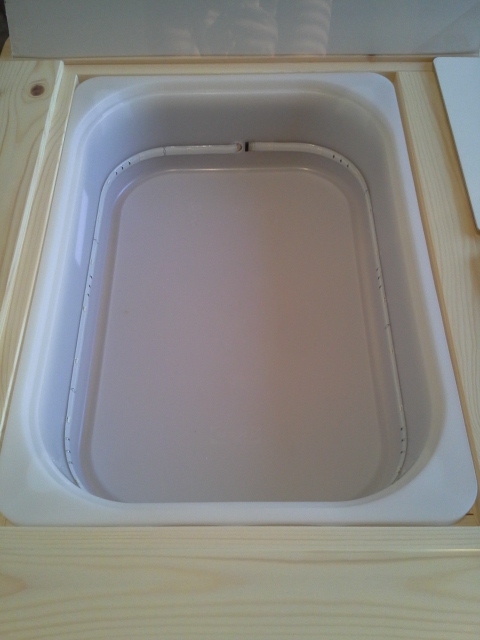
This is where my husband took over the project. He drilled a small hole in the plastic storage bin to slide the cord through, and then taped it to the outside of the bin. The LED strips were self adhesive, and he lined them inside the basket. Here’s where the protective film on your plexi glass comes in handy. LED lights are BRIGHT (Oh, this also has a dimmer feature!) and can hurt little one’s eyes. The film cuts down on the glare and allows for the child to stare at the colorful table top without burning his eyeballs out of his head.


The storage on the other side of the table is a great spot to hold all of the tiles, and the table top just gently slides right into place when you’re done!
Since this is a birthday present for my son and it’s not quite his birthday yet, I let my oldest check it out to make sure it was as awesome as I thought. She completely agreed and put her stamp of approval on it. : )
Price Breakdown:
Ikea Flisat Children’s Table: $49.99
Two Coordinating Ikea Storage Bins: $3.00 ea / $6.00 total
Two Ikea Mammut Children’s Stools: $7.99 ea / $15.98
18″ x 24″ Acrylic Sheet: $11.97
LED Strip Color Change Light: $39.99
TOTAL: $123.93
Not only did I save over $175.00 for crafting our own custom table, we also doubled the space that this particular brand offers! Instead of “just” a light table, we have a fully functioning desk too! It’s two tables in one! With a pretty awesome light feature now : )


I used one of these Ikea tables to make a Montessori weaning table & sensory table for my daughter. I would love to make this light table for her as well. Thanks for sharing!
LikeLike
You’re very welcome! I’m glad it’s inspired you : ) I have to say, after my three year old using it DAILY for the past two months, it is still our favorite thing ever! It was well worth the time and cost. Good luck on creating your own for your daughter! : )
LikeLike
Thank you for sharing! I’ve had this bookmarked for several months now with plans to make this light table for my son for Christmas. We have all the supplies now except for the plexiglass/acrylic sheet. Planning to buy it from Lowes tomorrow and having them cut it to size. I have bought Magformers and View Thru Geometric Shapes for the light table so far. Hoping to buy Magnatiles one day too.
LikeLike
How wonderful!!!! It’s still my son’s favorite after six months! I know your son will love it on Christmas morning : ) Happy Holidays!
LikeLike
You mention having to cut the acrylic board. What are the actual measurements needed to fit the table? Thanks!
LikeLiked by 1 person
Hi Penny! We actually did not take any measurements. I took the removable table top “lid” into Lowe’s and handed it to the employee, who then clipped it to the acrylic sheet and cut it to match perfectly. It fits like a glove as if it were meant to always be there! 😉
LikeLike
May I ask where you found the lights. I hAve looked and stores like Home Depot and Lowes but can’t find them
LikeLike
I found our lights at Lowes but here is a link where you can buy them online at Walmart! I believe you can even ship-to-store so you don’t have to pay shipping ; )
https://www.walmart.com/ip/Color-Changing-Four-2-Led-Light-Strips-With-Remote-Control-Sylvania-Lighting/177405548?wmlspartner=wlpa&selectedSellerId=1187&adid=22222222227046371362&wmlspartner=wmtlabs&wl0=&wl1=g&wl2=c&wl3=95796894290&wl4=aud-261800281660:pla-218230763570&wl5=9028269&wl6=&wl7=&wl8=&wl9=pla&wl10=112549749&wl11=online&wl12=177405548&wl13=&veh=sem#about-item
LikeLike
Thank you so much! I saw those but wasn’t cretain they were the right ones. I appreciate your response!
LikeLiked by 1 person
You’re so welcome! I should really be more active on here, haha, I keep meaning to post new projects but time just gets away from me!
LikeLike
I purchased the same lights from Amazon for $34. Includes 4 light straps that are each 2ft long for a total of 8ft. Only using 2 of the 4 light strips for this project. https://www.amazon.com/gp/aw/d/B008COVFUA/ref=mp_s_a_1_1?ie=UTF8&qid=1482338318&sr=8-1&pi=SY200_QL40&keywords=sylvania+led+mosaic+lights&dpPl=1&dpID=51QU4fAUcCL&ref=plSrch
LikeLike
How did your husband secure or attach the adapter for the lights? I appreciate your help! Thank you!
LikeLike
He used the sticky Velcro squares but he said tape would work as well! We’re actually going to make my nephew a table for his birthday, so we get to go at this again! ; ) So much fun! Have you already put it together or are you still in the process?
LikeLike
I don’t actually think the adapter needs to be secured. It can just dangle and should reach the floor. Note to other readers: The Lowe’s employee who cut our plexiglass said the film would peel off so if I wanted the acrylic sheet frosted I’d need to spray it with a frost spray paint. I did this and the spray paint caused the plexiglass to crack and now it’s ruined and looks shattered. Disappointed. Hoping Lowe’s will allow me to replace it at no charge because I upgraded at the suggestion of the employee for the thicker plexiglass at double the price of $20. It’s really at the fault of the employees suggestion that I used spray paint to frost it when apparently spray paint should not be used on plexiglass becausee it will cause it to crack. Learned that the hard way. I may choose to get a sheet of frosted contact paper for the new piece of plexiglass or just leave it alone.
LikeLike
Oh no! Our plexiglass sheet with the film hasn’t peeled much at all, just slightly at the corners and barely noticeable … and it’s been six months! My husband said for the next table we make, he’ll just apply tape at the corners to ensure no peeling at all. I really hope they exchange it for you!!! I’m going to do add an update picture to show the table in it’s current state after daily usage for half a year : )
LikeLike
I am in love with light tables and am so happy you posted this DIY! I just made the table for my little one! He LOVES it.
LikeLike
Hi there! First I wanted to say thank you for sharing the link for the lights earlier. We bought the same ones. Made this project for our two year old in December and it worked out great. Thank you for posting!
LikeLike
You are so welcome!!!! I’m glad you are enjoying it! My son is still LOVING his table and it’s been almost a year!!!! Thank you for your comment 🙂
LikeLike
I made a light table- my plexi had a blue film on it so we had to spray it- I do not think for the size table we have enough lights. We sprayed it outside and the spray went on in waves. I am terribly disappointed with my results. As it was I was quoted a price for plexiglass here and when I went to pick it up they asked me for 65!! I fought that as that was $30 more. I think my light table in comparison to others is a disaster.
LikeLike
I’m sorry you had that experience! Our plexiglass was under $12 and we didn’t have to spray it as we left the liner on it. As far as the light to table ratio, I’m not sure if you used the exact strip pictured here or the exact IKEA table, but we enjoy it without lacking any lights. May I ask what materials you used and where you were told $65 for plexiglass?
LikeLike
I am making it for me. Retired 2 years Early Childcare Educaor.
LikeLike
Thank you for the tutorial! I just made this for my sons today. We don’t have an IKEA near us but I lucked out and found the table on Craigslist. I found a similar light set at Walmart for $17. I decided to do both sides of the table and we just drilled a hole in the side of each tub and strung the lights between the two. It was going to be $30 for the plastic sheet but we lucked out and they had a scrap piece they cut for us so it only cost $12 🙂 The protective film on the plastic was pretty see through so I painted it with a frosted glass spray paint and it turned out great!
LikeLiked by 1 person
Hi! I’m in process of following your steps to make this table. Just wanted to double check about the lights. Did you just do the one loop around the bottom of the tray (as pictured) or did you use all of your package of lights? Thank you! Very excited about this Christmas gift!
LikeLike